I was introduced to "Chicken Broccoli Casserole" when I was in college. I'd never had it before then and I doubt I ever would have eaten it in college if they hadn't consistently served it on the same day the served "Shit on a Shingle" (or whatever less negative name you call it). Eventually, I did try both of these dishes and found that I actually really like Chicken Broccoli Casserole. I've made it a few dozen times over the years when I get the urge, but haven't had it in at least two years, and that's been largely due to the high dairy content. So, I was quite happy when I stumbled upon this recipe and realized it was basically the same thing, except dairy-free. As soon as I read it I knew I'd be giving it a try and soon. Soon turned out to be the very next day.
I headed to the store earlier today to make sure I had the couple of ingredients I knew I was lacking: cashews and broccoli. The fresh broccoli was looking a little piqued so I opted for frozen. It was 4:30 when I decided I should pull up the recipe and make sure I knew what I was doing before I started cooking... and that's when I saw that I needed to soak the cashews. Luckily, she provided a quick way to do so, or I'd have had to put this dish off until tomorrow. So, I got those going knowing I still had plenty of time before Paul got home and finished working out.
Once Paul got home I started on the rest, cooking the chicken and throwing everything else in the blender.
Somehow I missed the part about adding the chicken stock to the blender
so I was fighting to get everything to cream. I finally pulled it out of
the regular blender and ran it through my Tribest (which will blend anything) and got it fairly creamy. I then added that to the pan with the broccoli and chicken and poured in the chicken stock stirring it all together.
I let that cook down for a little bit and walla! Paul finished working out and commented that he smelled curry (which made him happy and more willing to try something that I wouldn't give him the ingredient list for). I wasn't sure how he'd react but he was quite happy with it (as was I). I'm sure it would be better if I'd added the chicken stock during the blend phase, but it was still very good and now I know how to make a dairy free cream sauce.
Ok, it looks a little gross, but it was really really good. Oh, and I topped it with almond meal instead of the flax meal, which did give it that nice bread-crumb texture. I'd definitely make this again.
The Missing Ingredient
I'm not quite Paleo, but I am gluten-free & dairy-free. I don't follow instructions well (as you soon will see). My pantry isn't bare, but it's always missing something. I decided that instead of just pinning a million recipes that sounded awesome, I'd finally start trying to make a few of them. The only problem is that missing ingredient.... and those pesky directions.
Friday, October 11, 2013
Tuesday, February 19, 2013
Bacon covered meatloaf for 2
As soon as I saw this recipe, I knew I had to make it and soon. Everything is better with bacon, after all. Luckily, we had some chicken sausage in the freezer. I forget the brand but it was a gluten-free chicken sausage we picked up at CostCo. I will say that this particular sausage seemed really greasy when we cooked it. We were all out of ground beef, though, so that meant a run to CostCo. Once I had everything in hand I set out to make the meatloaf of all meatloafs.
I've really got to get better at taking more pics as I go, but it's a little hard when your hands are all sticky and covered in meat mixture. Since there are only 2 of us, I cut the recipe in about half. My recipe looked like this:
1lb ground beef
2-3 chicken sausages (casings removed)
1 egg
1/2 red pepper (diced)
1/2 red onion (diced)
handful of parsley (I used dried because it was all I had)
3 cloves of garlic (chopped)
1/2 cup almond flour
3Tbsp horseradish mustard (we had Dijon but horseradish just sounded better)
2 Tbsp bbq sauce
1/2 lb of bacon
salt, pepper
Preheat over to 350. Grease your loaf pan with coconut oil. (Do this first or, like me, you'll have to get someone else to do it later when your hands are all covered in meat). Mix the ground meat, sausage, egg, red pepper, onion, almond flour, garlic, mustard, salt & pepper together in a bowl. Use your hands, it's really the only way to mix a meatloaf. Form it into a nice loaf shape and drop it into the greased loaf pan. Salt & Pepper the top of the loaf. Cover the top with BBQ sauce. Then cover it with bacon. I tried to lay them out ahead of time like they did in the other recipe but then I couldn't figure out how to transfer them to the loaf. So, I laid a few pieces across the loaf in one direction then went back the other way and so on, until it was nice and covered. Then place it in the over for 90 minutes. Note, I found that my loaf was creating a lot of grease (I blame the sausages I used) so I took it out at about 60 minutes and drained most of the grease off.
I served our meat loaf with some nice sauteed (and slightly crispy) baby bella mushrooms. It was quite yummy.
Sunday, February 17, 2013
Brownies > Bread
I was trying to make bread, really I was.
I've been wanting to try this Paleo bread recipe for a while and today I was all set to do just that. Unfortunately, I only managed to properly seperate 3 eggs. I ended up dropping the yolk of the fourth egg into my whites and there went my plan.
Left with 4 eggs, I had to find something to do with them, so I went through my dessert board, figuring that I'd find something I could do with 4 eggs. Then I found these brownies sitting at the top of my Paleo dessert board.
I whipped everything together wondering how well this would really work. I was craving some coffee so I threw a little into the mix before throwing it in the oven.
Ok, so I didn't wait 3 hours (or throw them in the fridge), I cut in after about 20 minutes because I just had to know. In the picture above you can see that they are actually a rather cakey brownie and honestly were a little dry. I'm hoping that maybe after they sit a little while and cool off they will be a little better. I expected fudgier brownies since they were flourless.
Trying them again a few hours later and pieces in the middle seem to be somewhat fudgy but at the same time still really dry. Hubby tried them and said they were good, but dry. He suggestd that the added coffee may have decreased the moisture.
Wednesday, February 13, 2013
Coconut milk coffee creamer
I've been gluten and dairy free for a little over a year now. I'm not a fan of the processed milks and creamers, but I do like something in my coffee. I've taken to just using canned coconut milk or fresh almond milk. I'd run across this recipe on Pinterest for Coconut Milk Creamer. There's just two problems with it... butter and egg. The two Paleo foods that I avoid.
I decided to try my own take on this recipe.
1 can coconut milk
1/2 banana
1 tsp Vanilla
1 tsp Peppermint extract
I put all that in the blender and blend well. Store it in the fridge until needed.
Depending on the fat quality of your milk, it will stiffen into a heavier cream in the refrigerator. If you use a full fat coconut milk it will become not unlike a really good frosting or (frozen) cool whip after a few hours in the fridge. Then you can just eat it with a spoon. Nope, I've never done that... never! :)
When ready to drink, add 10oz hot coffee plus 1/2 cup of above creamer to blender and blend. It will give you a nice frothy consistency, not unlike cappuccino.
Tuesday, February 5, 2013
DIY Valentine: Restaurant Passport
On the lookout for an idea (any idea) of something to give my hubby for Valentines Day (I am notoriously unromantic, to the point of often forgoing gifts), I ran across this little gem on Pinterest.
What an awesome idea, especially considering we often find ourself (just as Steph did) hitting up the same restaurants time and again. My food restrictions don't help and because of said restrictions I often get stuck picking where we eat. So, what better way to offer him a little control over where we eat than giving him a prepared list of restaurants that offer food I can eat. Plus it makes for a fun way to ensure that we try some new places this year.
The problem: My hand-writing is awful and all I could imagine was how junky a notebook with my writing in it would look. So, I decided why not make something that looks a little bit nicer, and so I did.
The notebook: I found at Dollar Tree (for, you guessed it, $1). Next I needed to print up the pages to go inside. I figured out that if I could find a template that would do 6 to a page it would work perfect. Since I suck at Word and have no idea how to make a template from scratch, I did a little search and found one I could modify and created the template to the left. If you'd like this template just email me and I'll be happy to send it to you.
I then printed the template onto 8x11 sticker paper to make things easier. And attached a little heart sticker onto each page (so we can mark off when each restaurant is visited). I didn't put the restaurants into any particular order. Thinking about this, I probably should have alphabetized them to make them easier to find when we do visit them. I'm also thinking that some restaurants may get visited multiple times, so I should probably add some extra stickers in the back.
I put the stars on the pages so that we could fill in a rating for each restaurant. Also, I only put one restaurant every other page, leaving the left hand page empty. I figured this would give us space to write our thoughts, or share anything special about that visit. If you wanted, you could also fill in the stars to indicate price-range. I think if I did that, I'd only do 3 stars on the page.
Next was the Passport Cover. Initially, I was going to try to modify the looks of an actual Passport cover, but as I played with it and found a cool picture, I changed my mind. A big thank you to Boudewijn Berends for making this photo available via creative commons. I edited it just a bit to add the text "2013 Restaurant Passport", printed it out on another sticker sheet and stuck it on the cover of my notebook. Here are the end results.
If I did it again I'd buy a different type of notebook. Instead of a cheap $1 notebook, I'd find a journal type notebook that was made to stretch out. I already noticed that a page in the back of this notebook is coming loose. I've got time so I'm tempted to redo it.
Thursday, January 17, 2013
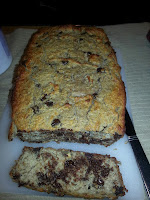
Paleo Banana Bread
I blame the change in hormones following my surgery (or something), as today I seem to be in full on "nesting" mode and can't seem to focus on much else. I started off the morning making Hot & Sour Soup (of course I was missing most of the veggies and tofu, and it was snowing outside, so it's not quite the same as the recipe I posted previously). I haven't tried the soup yet because someone got me a little distracted... with banana bread.
Paleo Banana Bread |
My friend Cassy posted this recipe on Facebook and tagged me with it. I think the implication was "let's get the person who probably has the ingredients to make it and try it before I waste my time, etc". I took the challenge and learned a lot in the process. As I was making it I texted her "This better be good because I'm using the last of my almond flour". Turned out I had exactly 2 cups left (might have been more if I'd had a sifter).
Of course, since I'm completely incapable of following recipes, my recipe was more like this:
3 eggs, separated (keep the yolks and whites separate!)
3 or 4 tbsp honey (up to you!)
4 tbsp (soft) coconut oil (you may need to warm it up if it's hard).
3 mashed bananas (3 small, or 2-3 big)
1 tsp vanilla
1 tsp baking powder
1 tsp ground cinnamon
2 cups almond flour
1 cup pecans
2 large handfuls of chocolate chips
Directions:
- Preheat the oven to 350 degrees.
- Cream the egg yolks and honey in a large bowl until light and fluffy. I use a hand-held mixer for this. It didn't take long.
- Add the coconut oil, vanilla, and mashed banana to the bowl, mixing well.
- In a smaller separate bowl, mix the cinnamon, baking powder and almond flour and sift well.
- Add that mixture of spices and powder to the bowl and stir well.
- In a separate bowl, beat the egg whites until stiff peaks form. Use hand mixer on high. Stiff peaks are vital.
- Fold the egg whites into the banana mixture to pull it away from the sides before gradually folding the rest of the egg whites into the mixture.
- Add nuts and chocolate chips (if desired)
- Grease bread pan with coconut oil (or butter)
- Place in oven for 40-45 minutes, until top is golden brown.
- While the bread is still warm coat the top with butter or substitute (I use coconut spread)
I did my best to actually follow the directions given. However....
- I use coconut oil in EVERYTHING
- I like a LOT of cinnamon
- I don't own a sifter (I need to rectify that).
- - I was running low on honey so I used a little less, figured the bananas would be sweet enough (and I was right).
- Everything is better with chocolate!
Why can't I get stiff peaks? |
Tip: Make absolutely sure that you don't get any yolk in your egg whites or they will not get stiff! That said, I ended up using 6 eggs for this recipe because I had to start over.
I used coconut oil to coat my bread pan and when I first pulled the bread out and tasted it I felt like it was missing something. That's where I decided to try a good coat of coconut spread (I don't do butter) on the top. It tastes just like butter so it gave it that same flavor and tasted quite good. I took Paul a piece to try and when I tried to walk away after his first bite he grabbed the rest out of my hand, then came back for me. Verdict: It was worth using the last of my almond flour and wasting 3 eggs to make.
Labels:
baking,
dairy-free,
gluten-free,
paleo,
recipes,
snacks,
vegan
Thursday, January 3, 2013
Winter Art Pieces (Playing with my Cricut)
Mostly this blog is things that I found on Pinterest and was inspired to try to create. In this case, I didn't find my inspiration on Pinterest, but rather on the shelf at TJ Maxx. I saw this cute art piece hanging on the end of the rack as I wondered through the store on Black Friday. I don't know what I was thinking even going in the store that day (but I did find a good supply of yummy GF cookies). I thought this was really cute but felt like it was totally something I could create on my own. Initially, I thought I would actually try to recreate it, but that's just not who I am. In the end, I just used it for inspiration.
In October I convinced my husband that I needed a Cricut. I'm still not really sure how I pulled that off, other than that he seems to have an issue saying "no" to me, so unless I talk myself out of something I want I usually end up with it. Since I hadn't had time to really do much with it, this project became my first one using the machine. I'd played around with it a little bit cutting some basic shapes and just getting a handle on how to use it, but this time it was on purpose.
First I had to find a reindeer, there are tons of cartidges with reindeer on them, but I ended up buying (via the Craft Room) the basic Christmas cartridge, which had several reindeer options, as well as lots of other good winter and Christmas images. From there I printed off the my reindeer of choice on several different cardstocks (including a basic brown). I had already created some shapes to make snowflakes with (during my earlier testing of my new toy).
The one thing I really loved about the original image above was the burlap background with the worn paper look on top of it, so I decided to stick with that. For the base I used a piece of wood (if I did it over again I would just use a 12x18 canvas). I covered the wood with the burlap (which was a learning process for me) using spray adhesive and staples. Then I built my main image on a piece of poster board before I adhered it onto the burlap. The top half of the background image is a napkin (I seperated the layers and just used the top layer with the color), then I used pieces from 3 different scrapbook papers. I'm pretty happy with how it turned out, really not much like the original inspiration other than that they both have a reindeer. Looking at it now there are definitely things I'd do differently if I had it to do over, but that's always the way it is.
While I was playing with Christmas themes, I used some tree images and some of my left-over snowflakes and put this together. More for practice with the Cricut than anything else.
Subscribe to:
Posts (Atom)